Get Started
There are two ways to sign into Midway using 2FA: SSH and ThinLinc. You can see how to use both using the step-by-step guide detailed below.
Before you use 2FA, you have to go to here and set up 2FA for your UChicago CNetID.
- 1. If you are a Mac user, open
terminal. If you are a windows user, open a terminal client such as Mobaxterm.
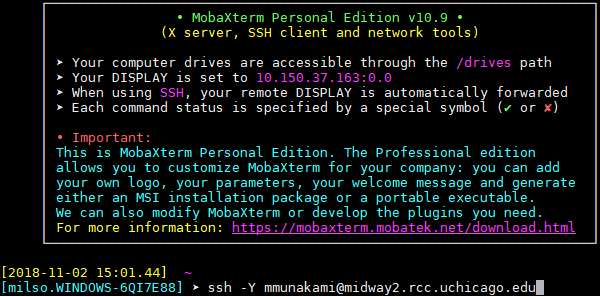
- 2. Enter the following line of
code:
ssh -Y YOURCNetID@midway2.rcc.uchicago.edu
“(Replace the part where it says ‘YOURCNetID’ with your UChicago CNetID)”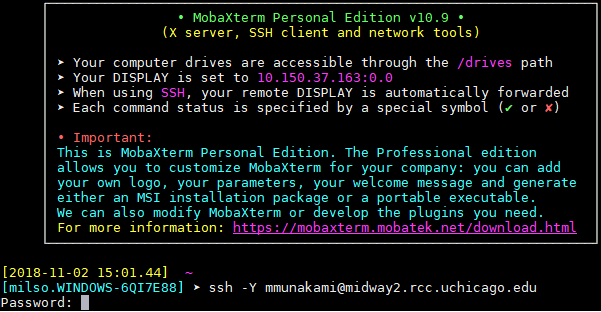
- 3. Enter your regular password for your CNetID.
- 4. Once you have logged in, you
will see a 2FA authentication prompt. It will present you with three or more options
(based on number of devices you have registered for 2FA). Note: In this example, we are
showing user with one device registered for 2FA authentication. It will present you
with three or more options as follows:
1) receive a push code on your Duo app,
 2) Receive authentication through your phone number, and
 3) get an SMS code.
You will enter the option you want to choose.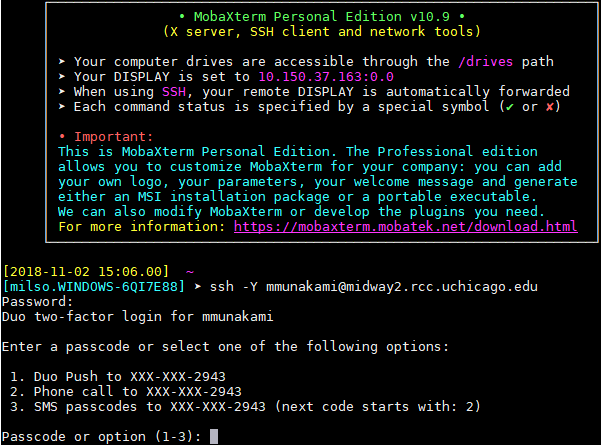
-
Option 1 – Duo Push
- Enter the number 1 and press
enter. Open the Duo app on your phone or other registered electronic device. The screen
will prompt you that you have one waiting request. Open the request, and check if it
matches with the session you are about to start. If it matches, accept this. Your
terminal should automatically display the following screen:

- Now go to step 5
-
Option 2 – Phone Call
- Enter the number 2 and press
enter. Your phone will ring shortly after you press enter. Answer the phone call. An
automated voice will tell you 2FA is being requested for your account. Press any key on
your keypad to accept the session. The screen on your terminal will automatically
change to show the following:
- Now go to step 5
-
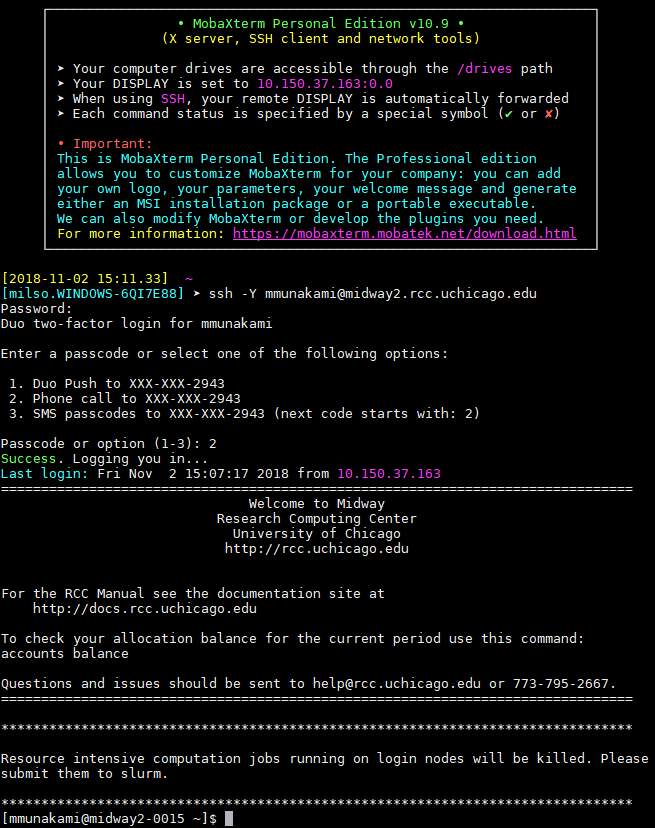
Option 3 – SMS
- Enter the number 3 and press
enter.
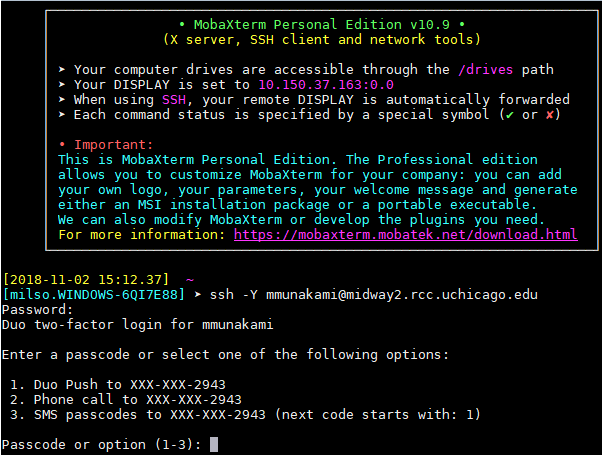
- Check your phone or registered
electronic device you have set up to receive text
messages. You will receive an SMS with ten codes. Enter the code with the number the
2FA screen prompts you with – it will say “the next code begins with” followed by a 1,
2, 3… etc. You can request new codes every time, or you can use the next code in the
sequence you received in the text message. Once you enter the correct code, you will
see the following screen:
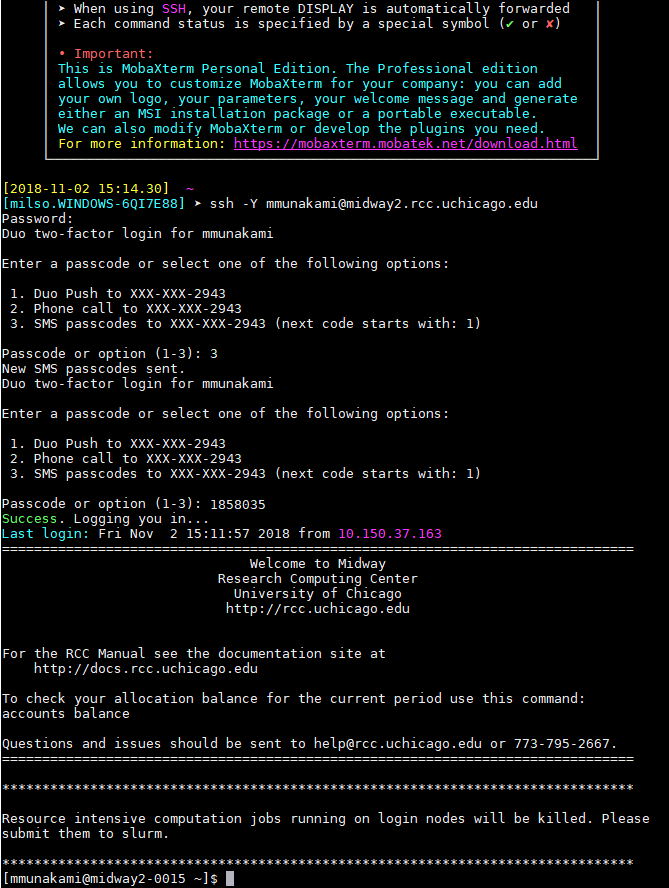
- 5. Congratulations. You are now ready to use Midway!
Before you use 2FA, you have to go to here and set up 2FA for your UChicago CNetID.
- 1. Go to https://midway.rcc.uchicago.edu or http://midway2.rcc.uchicago.edu in your browser.
- 2. Once you proceed to the page,
you will see a login screen. Log in with your CNetID and password like you would
regularly
log in to Midway.
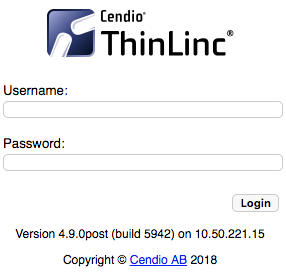
- 3. Enter your regular password for your CNetID.
- 4. Once you have logged in, you
will see a 2FA authentication screen. It will present you with three options:
1) receive a push code on your Duo app,
 2) Receive authentication through your phone number, and
 3) get an SMS code.
You will enter the option you want to choose.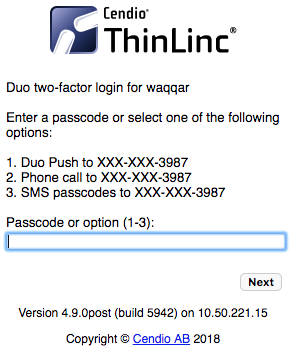
-
Option 1 – Duo Push
- Enter “1” into the box and press
next. You will see the following screen:
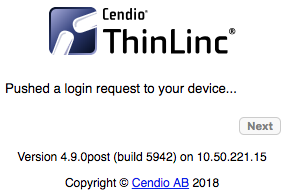
- Open the Duo app on your phone or
other registered electronic device. The screen will prompt you that you have one
waiting request. Open the request, and check if it matches with the session you are
about to start. If it matches, accept this. Your browser should automatically display
the following screen:
- Now go to step 5
-
Option 2 – Phone Call
- Enter the number 2 and press
next. You will see the following screen:
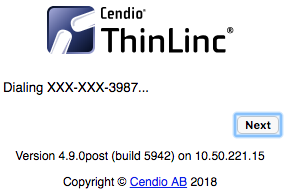
- Answer the phone call. An
automated voice will tell you 2FA is being requested for your account. The screen on
your browser will automatically change to show the following:

- Press any key on your keypad to
accept the session. The screen on your browser will automatically change to show the
following:
- Now go to step 5
-
Option 3 – SMS
- Enter the number 3 on the browser
and press next. You will see the following screen:
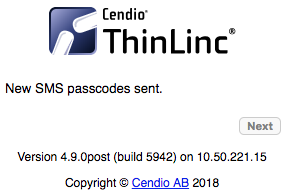
- Check your phone or registered
electronic device you have set up to receive text messages. You will receive an SMS
with ten codes. Enter the code with the number the 2FA screen prompts you with – it
will say “the next code begins with” followed by a 1, 2, 3… etc. You can request new
codes every time, or you can use the next code in the sequence you received in the text
message. Once you enter the correct code, you will see the following screen:

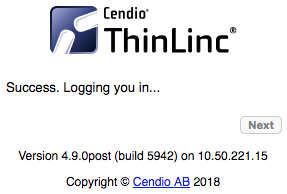
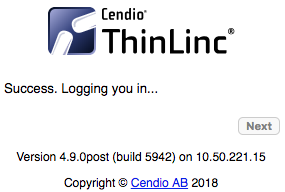
- 5. Once you have completed the
2FA
step of the login process, you will see the following screen:
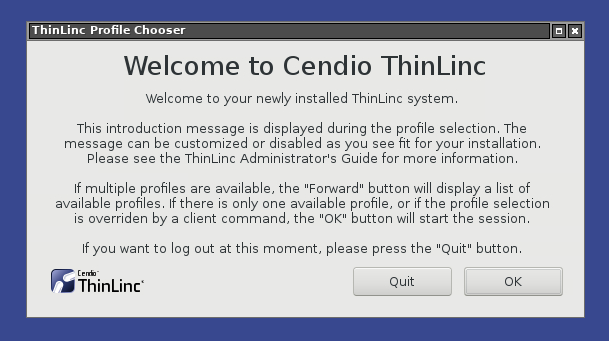
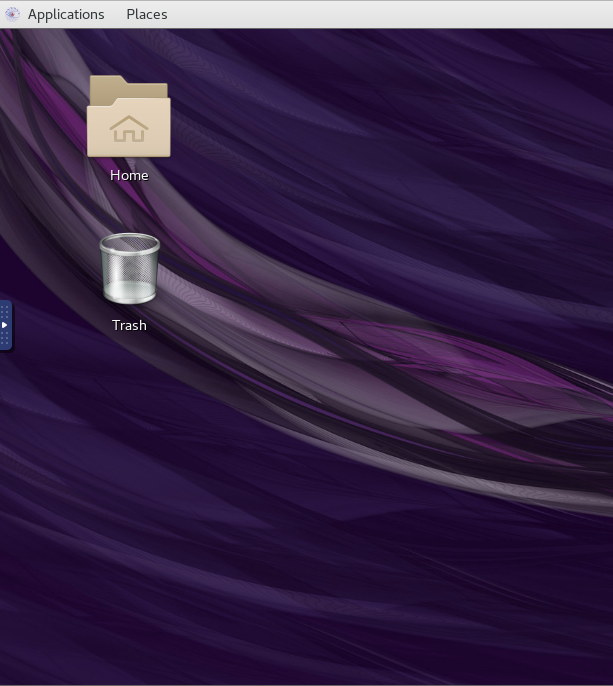
- 6. Press "OK" and you will be
taken
to your Midway environment that looks like this:
- 7. Congratulations. You are now ready to use Midway!
Once you launch the FileZilla application, please follow the instructions below to setup FileZilla with 2FA:
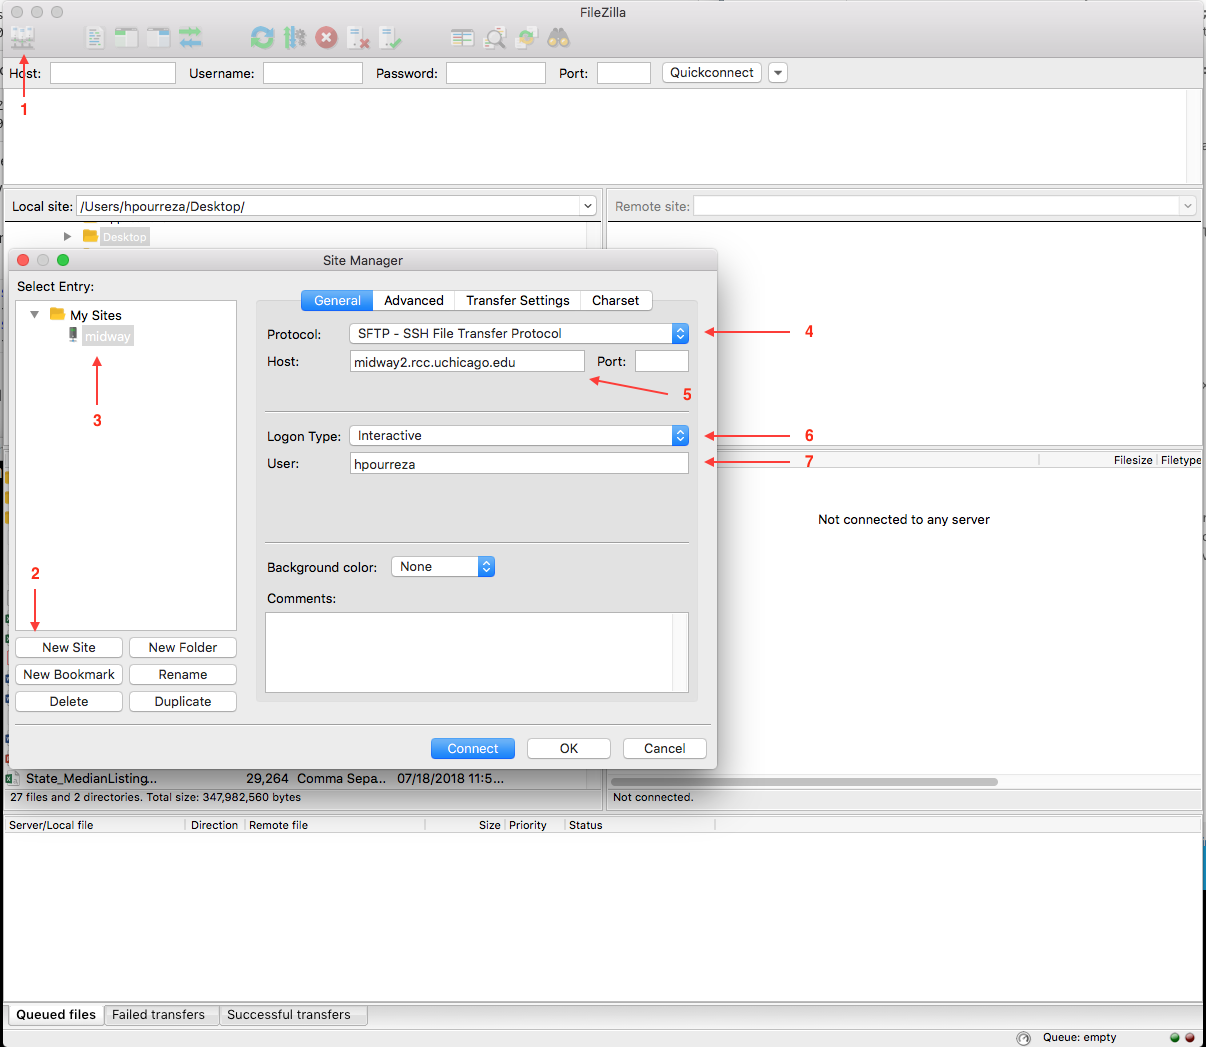
- 1. Click on the Site manager icon at the top left corner
- 2. Click on the New site button
- 3. Name the newly created site (eg Midway)
- 4. Select SFTP from the drop-down menu for Protocol
- 5. Enter Host name (midway2.rcc.uchicago.edu for example)
- 6. Select Interactive from the Logon type drop down
- 7. Enter your CNetID in the User textbox
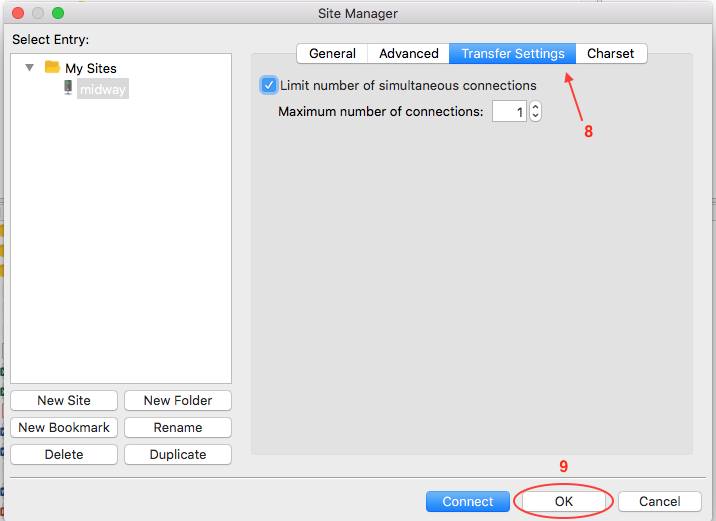
- 8. Click on Transfer Settings tab and check the “Limit number of …” box and select 1 in the textbox
- 9. Click OK to save the settings
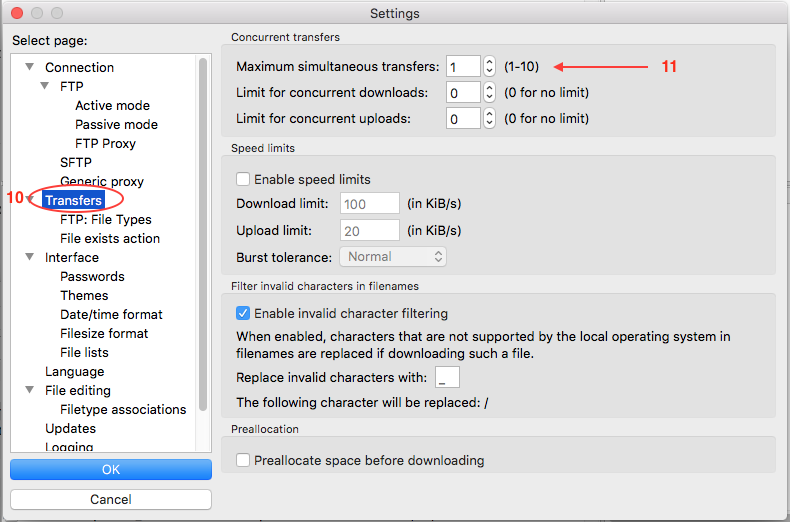
- 10. From the Settings menu, select Transfers from the left window pane
- 11. Enter 1 in the “Maximum simultaneous transfers” box
- 12. Click OK to save your settings
- 13. FileZilla is now ready to connect to Midway. Please go to the site manager and click on the name that you selected in step 3. Then click Connect. You will be prompted to enter your password followed by one of the 2FA options (e.g., push, call, etc.). Please select the option number that you usually use to connect to Midway.